I was planning to test the Migration Assistant feature in vRA 8.x and got some free time to migrate vRA 7.6 to vRA 8.2 in my lab, it was great learning and thought to capture my experience for larger audience. There is an official guide, “vRealize Automation 8 Transition Guide”.
So will start with the Migration prerequisite as below.
Migration Prerequisites:
- Backup your vRealize Automation 7 source environment.
- If your source vRealize Automation 7 content has dependencies on vRealize Orchestrator, you must first migrate vRealize Orchestrator. If you migrate vRealize Automation without migrating vRealize Orchestrator first, migration fails.
- To migrate embedded vRealize Orchestrator content with vRealize Automation, you must first migrate vRealize Orchestrator.
- Manually create tenants using LCM. vIDM tenant migration is not supported in vRealize Automation 8.2.
- You must first import and install the IPAM plugin in vRealize Automation Cloud Assembly to migrate an IPAM endpoint.
- After running a migration assessment, the vRO Azure endpoint configuration is populated on the Configuration tab. Before running a migration, you must manually enter the key by editing the configuration. If you attempt to migrate without providing the endpoint key, the migration fails.
- For subscriptions, the input type ‘payload’ is not supported in vRealize Automation 8. Before migrating your vRealize Automation 7 subscriptions, you must update the input type to ‘Properties’.
- vRealize Automation 8.1 did not require you to accept a source certificate during migration assessment. As a result, you must reassess your source environment. To reassess your source environment and accept the source certificate: delete the source environment, re-add it, accept the certificate, and reassess the source environment using the migration assistant service.
Migration Consideration:
Ok, so let get into lab and see how it goes. In my lab I will perform the below task in steps to complete the Migration task.
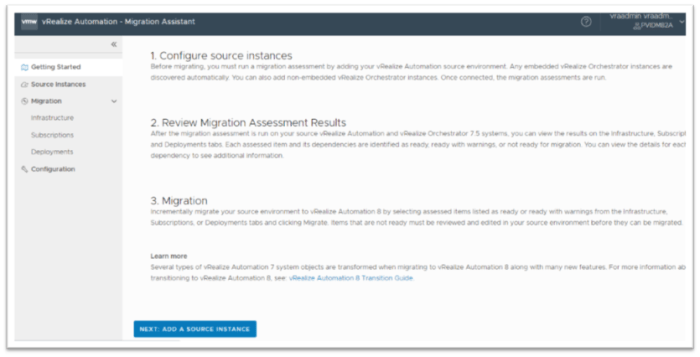
1. Running a Migration Assessment
2. Migrating vRealize Orchestrator
3. vRealize Automation Infrastructure Migration
4. vRealize Automation Subscription Migration
5. vRealize Automation Deployment Migration
6. Post Migration task
7. Validation
1. Running a Migration Assessment
Before you can migrate to vRealize Automation 8, you need to perform a migration assessment.
You can perform a migration assessment against your source environment and any embedded vRealize Orchestrator instances to determine the migration readiness of your vRealize Automation 7 source environment. The migration assessment alerts you to any system object and its dependencies that are not ready for migration and that will impact your migration process
Before you can run a migration assessment and migration, you must enable the migration assistant service.
To enable the migration assistant feature:
- In your vRealize Automation 8.2 instance, navigate to Identity and Access Management.
- Select the user, edit the role to Cloud Administrator, and migration service administrator or viewer. Add the migration assessment service.
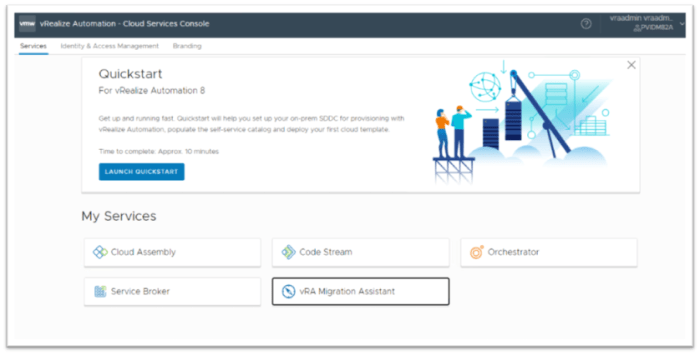
- Log user in to vRealize Automation 8 to see the Migration Assessment tile.
1. Login to vRealize Automation 8.2 with a user having migration service administrator permission and click on vRA Migration Assistant.
2. Click on NEXT: ADD A SOURCE INSTANCE
3. Click on +ADD SOURCE ACCOUNT and select vRealize Automation
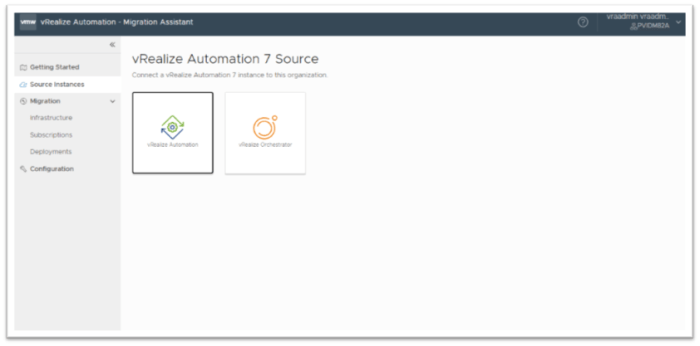
4. Give your source vRA instance details like Name, Hostname, System administrator & Password and click on VALIDATE AND SAVE, then choose the tenant going to migrate.
Also select Enable assessment for the embedded vRealize Orchestrator and click NEXT: ASSESSMENT

5. Monitor the assessment.
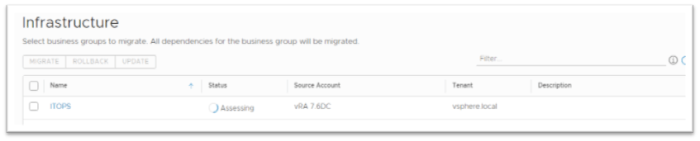
6. After running a migration assessment on your source instance, you can view the results in Migration pane and under Infrastructure, Subscription & Deployment tab.
The assessed items are listed with their status:
- Ready – Ready for migration. No action is needed for migration readiness.
- Ready with warnings – Ready but needs review. Remediate any issues that might impact migration. For example, some custom properties can be ready with warnings. The custom property: VMware.Network.Type is partially supported and is flagged as ready with warnings because it is unclear how this property behaves regarding extensibility in vRealize Automation 8.
- Not Ready – Not ready for migration. Review details of the item in your source environment and correct areas needing attention or deselect these items for migration.
- Assessing – Item is still being assessed for migration readiness.
- Assessment failed – The assessment failed, retry assessment.

In my case Business Group was Ready with warning, Subscription was Ready, and Deployment was Not ready. You have the check and fix any error.
After modifying any items listed as not ready or ready with warnings, click Update to update its status in the assessment results table.
2. Migrating vRealize Orchestrator
If your source vRealize Automation 7 content has dependencies on vRealize Orchestrator, you must first migrate vRealize Orchestrator. If you migrate vRealize Automation without migrating vRealize Orchestrator first, migration fails. To migrate the vRealize Orchestrator follow the below steps.
Prerequisites
- Migration is supported for vRealize Orchestrator 7.3 or later.
- Download and deploy a vRealize Orchestrator 8.x environment.
- Configure the authentication provider of your target vRealize Orchestrator environment. The authentication provider of the source vRealize Orchestrator instance is not migrated.
- Back up the target vRealize Orchestrator environment.
- Verify that SSH access is enabled on the source vRealize Orchestrator instance and target vRealize Orchestrator environment.
- Verify that the source vRealize Orchestrator database is accessible from the target vRealize Orchestrator environment.
Procedure
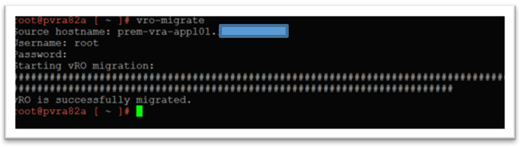
- Log in to the vRealize Orchestrator appliance command line of your target environment over SSH as root.
- To start the migration, run the vro-migrate script.
- Follow the command prompts to provide the fully qualified domain name (FQDN) and credentials of the source vRealize Orchestrator instance.
-
(Optional) To follow the migration progress, access the migration log:
- Log in to your target vRealize Orchestrator appliance command line over a separate SSH session as root.
- Run the tail -f /var/log/vro-migration.log command.
- Log in to your target vRealize Orchestrator appliance command line over a separate SSH session as root.

Note: Migration of clustered vRealize Orchestrator 7.x deployments to vRealize Orchestrator 8.x is not supported. You can migrate the primary node of your clustered deployment by stopping the services of the replica nodes before you run the migration script.
service vco-server stop
service vco-configurator stop
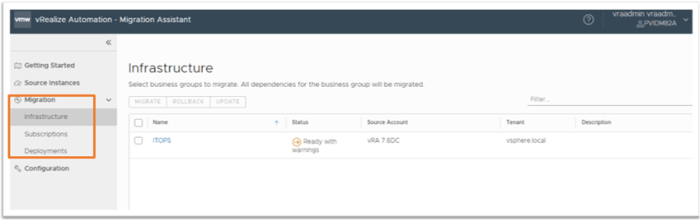
3. vRealize Automation Infrastructure Migration
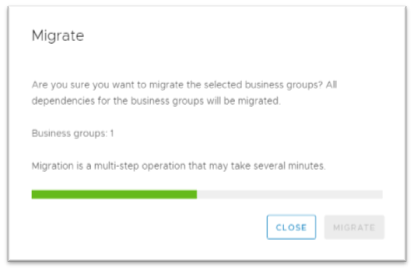
1. Once you are ready with the migration Select the Business group in Infrastructure and click Migrate.

2. Click MIGRATE on the Migrate popup wizard.

3. The Migration will start, and it will take several minuets depend on your business group configuration, once complete close the windows.
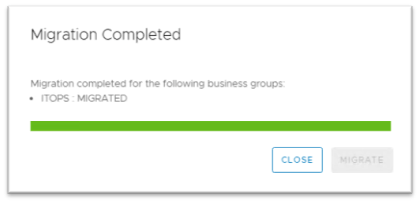
4. you can see the migration status as Migrated in Infrastructure tab.

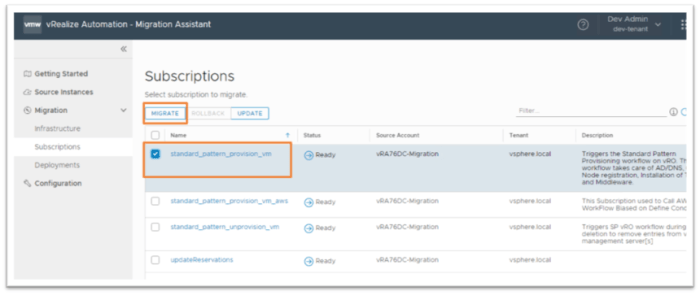
4. vRealize Automation Subscription Migration
1. In the subscription tab select one subscription and click on MIGRATE
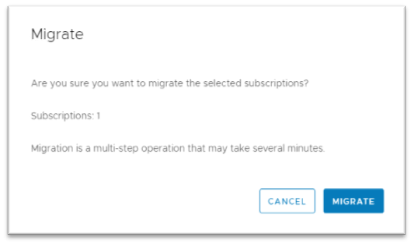
2. Click on MIGRATE on migrate popup wizard.
3. Once migration complete close the wizard.
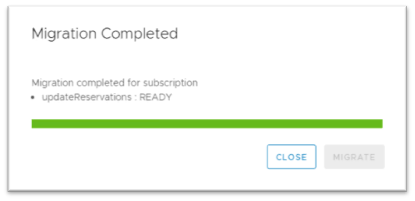
4. you can see the migration result and status in the Subscription tab.
- Migrating – Subscription is being migrated.
- Migrated – Migration is complete and successful. You can view and use the migrated subscription in your vRealize Automation 8 environment.
- Failed – The migration failed. Review the subscription in your source environment, modify as needed, retry migration.
- Excluded – Subscription that was listed as Not ready was migrated but it’s not ready items were not migrated and are listed as excluded.
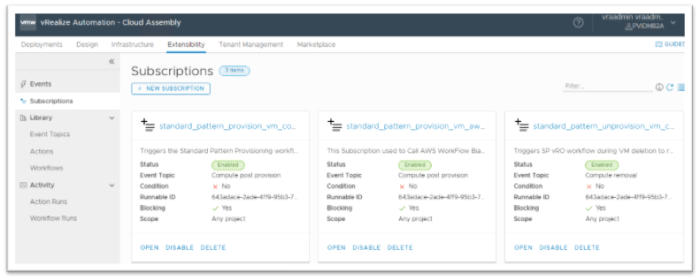
Tip: Migrated subscriptions are listed in Cloud Assembly > Extensibility

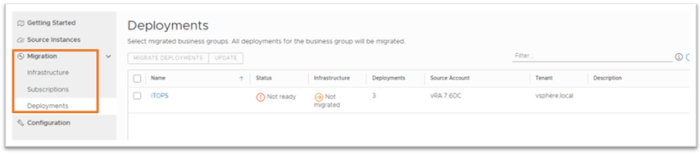
5. vRealize Automation Deployment Migration
You can only migrate deployments after successfully migrating the associated business group to vRealize Automation 8, regardless of deployment assessment status.
Note: Migration of a deployment is final regardless of whether it succeeded or failed. You cannot retry a deployment migration.
1. In the deployment tab select business group and click on MIGRATE DEPLOYMENTS.
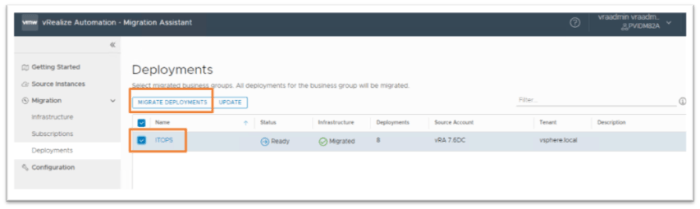
2. Click on MIGRATE on migrate popup wizard

3. Once complete close the wizard.

4. you can see the status as Migrated in deployment tab.

6. Post Migration task
To use catalog icons and any branding items, you have to manually add them to vRealize Automation 8 as they are not carried over during migration.
7. Validation
There are several ways to validate your migration, the very first is in the status of migration > Infrastructure/Subscription/Deployment.
Also, you can verify if your migrated data and feature are available in vRA 8.2
In my case I have verified, Project, Network Profile, Storage profile, Deployment, Blueprint, Subscription and Catalog Item.
All looks fine and migrated successfully.
Project validation:

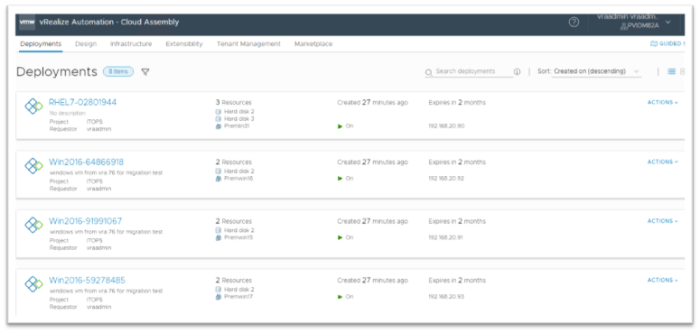
Deployment validation:
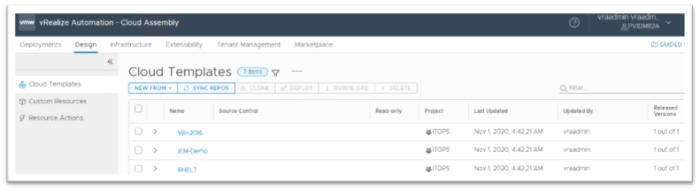
Blueprint validation:
Subscription validation:
Catalog Item:
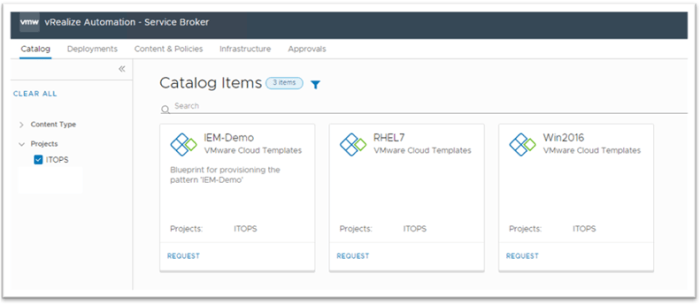
Also, you can try requesting a vm from migrated catalog item to verify the deployment.
So here we conclude that successful migration of vRA 7.6 to 8.2.
Thanks VMware for the detailed vRealize Automation 8 Transition Guide which helped to complete this demonstration.
