Today I am going to demonstrate the process to create and deploy blueprint in vRA 8.x. There are multiple steps to follow before your blueprint is ready to consume.
vRealize Automation Cloud Assembly is a blueprint development and deployment service. Below are the steps we are going to perform to build our first blueprint and deploy it.
1. Create Cloud Account
2. Create Cloud Zone
3. Create Project
4. Create Flavour Mapping
5. Create Image Mapping
6. Create and Deploy Blueprint
The above process can be seen in the below process flow diagram.
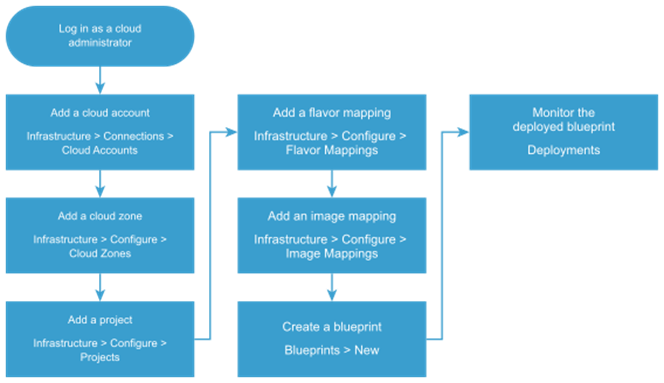
Image Credit VMware
Prerequisites
- Log in as a cloud administrator.
- Verify that you have the credentials required to connect to the cloud account.
Let’s get started…
Create Cloud Account:
Cloud accounts allow you to bring your public cloud and on-prem data centres under management.
Go to Cloud Assembly > Infrastructure > Connections > Cloud Account and click on Add Cloud Account. Select option to add a cloud account, In our case it’s vCenter.

Enter cloud account name and description, give address & cloud credentials then click Validate. Once successfully validated, select datacentre & choose NSX endpoint if created earlier.
Add applicable capability tags and say Save.

Now click Add and you will see the account has been added as below.

Create Cloud Zone:
Go to Cloud Assembly > Infrastructure > Configure > Cloud Zone and click on Add Cloud Zone.
Select an account/region and enter a name and description.
Select a placement policy that defines how provisioned resources are distributed among hosts in this cloud zone.
Add applicable capability tags.

Click the Compute tab and view the compute resources in this cloud zone. If you don’t want to use all the compute resources, add a tag to the compute resources that you want, and then enter that tag in the filter.

Click Create.
Create Project:
Go to Cloud Assembly > Infrastructure > Configure > Project and click on New Project.

Enter project information on the Summary tab. For this setup example, the project name is PLAB.
Click the Users tab and add one or more users. Project users must be existing active service organization users.

Click the Provisioning tab and add one or more zones. The selected zones must have the appropriate infrastructure resources to support the project goals. If you are just getting started, ignore Constraints and Custom Properties for now. You can go back and add them later if necessary.


Click Create.
Create Flavour Mapping:
Go to Cloud Assembly > Infrastructure > Configure > Flavor Mapping and click on New Flavor Mapping.
Enter a new Flavor name, such as Small, click in Account/Region and select one of the available cloud account/regions.
Specify a compute value.

Click (+) to add another flavor map row of the same size for each available cloud account/region. Click Create to create the mapping.

Create Image Mapping:
Go to Cloud Assembly > Infrastructure > Configure > Image Mapping and click on Click New Image Mapping.
Enter a new Image name, such as RHEL76. Click in Account/Region and select one of the available cloud account/regions.
Click in Value and start to type template name RHEL76, select one of the available RHEL76 configurations to complete the first map row.

Click (+) to add another image map row for an image for each available cloud account/region and Click Create.

Create and Deploy Blueprint:
Blueprints are specifications for the resources that you deploy. You can continuously improve a blueprint after you deploy it.
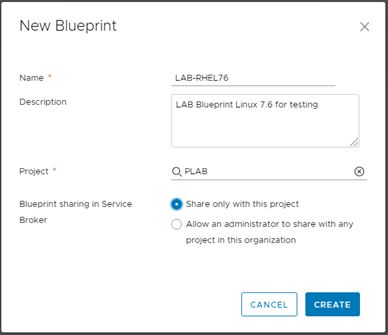
Go to Cloud Assembly > Design > Blueprints and Click New, enter a Name, select a Project, and click Create. It will open a Design canvas wizard.
The blueprint and project examples in this setup are LAB-RHEL76 and PLAB.
Drag components to the canvas, edit the code to configure properties.
For example, the YAML code below adds a flavor size and operating system image to the cloud-neutral virtual machine.
resources:
Cloud_Machine_1:
type: Cloud.vSphere.Machine
properties:
flavor: small
image: RHEL76

Once you blueprint is ready hit TEST to test the blueprint. If you have done everything correct the test will successful. Now we are ready to deploy our first blueprint by clicking on DEPLOY.
The deployment status can be view from Deployments tab in Cloud Assembly.

Now you can see the vm has been deployed successfully.

That’s it for this post. I’ll discuss more about blueprint & catalog item in my subsequent posts.
Hope you liked this post. If you think this post is helpful to you, please like, share & comment.
